Pages

Showing posts with label family. Show all posts

Monday, June 2, 2014

10th Anniversary Piece

I Will Love You by Annie Beez Folk Art
Stitched 2 over 2 on 25 ct. mystery linen with recommended threads

I finished up my anniversary piece for Mr. SweetPea. (We celebrated our 10th wedding anniversary in April).  As I mentioned before, I went to my LNS about 2 weeks before our anniversary to figure out what I was going to stitch for this milestone.  Because I enjoy waiting till the last minute....

Nothing was really doing it for me, until I spotted this one and remembered I had purchased it a few years ago and it was sitting in my stash.  I think I probably even bought it intending to stitch it for an anniversary.  So I picked up the fabric I needed, going a little larger than the recommended 32 count because I wanted to frame this finish.

For the most part, this was a super easy stitch, except for all those damn little confetti stitch stars.  I love how the look on the front, but they were kind of a pain in the butt to stitch.  I considered using seed beads but decided to stitch as designed.  Eventually I'll get this framed and hung on the wall.  Maybe even before our 20th anniversary.

And if you must have it RIGHT NOW, you can check out Annie's Etsy Shop for an instant download.

Monday, May 12, 2014

How Pinteresting... Part 3

One of the wedding pieces I blogged about used a printed velum paper overlay on a mat to bring in another aspect of the wedding theme. I used this same technique again to create a gift for my cousin's first anniversary.  Coincidentally, paper is both the traditional and modern gift for a first anniversary.


Their first dance was to a song called Then by Brad Paisley.  The photo is from their first dance, and the lyrics are around the outside.  Sorry for the flash, but it's hard to get a decent picture

The original idea came from a blog called Sparkle & Hay, but the post I pinned the picture from no longer exists, and I can't seem to find it anywhere.  (The blog seems to be out of commission)  I do remember that the project was hand lettered directly onto the mat.  I wasn't comfortable doing that, but if you want instructions, you can see how to do it here.  (And another tutorial for handwriting the lyrics)

I am far too much of a perfectionist AND I like to make things difficult, so I opted to do mine in Word.  I used the same font that my cousin used on her wedding invitations, Tiriani, but you can find hundreds of free handwriting fonts here.  I purchased the mat and frame first - the frame came from AC Moore and everything is inserted from the front.  There's just a thin border around the edge holding the glass in so I could use more of the mat (almost none of it is covered over by the edges of the frame).  This is an 8x10 frame.

Then I measured the exact dimensions and set up a document in Word.  It was a lot of adjusting, tweaking and playing around with sizing and spacing to get the song lyrics to fit and look evenly spaced.  Then I printed it on plain paper, lined it up against the mat, tweaked some more, printed again, and so on and so forth.  I needed to fill in a little space at the end, so I included not only the name of the song and the artist, but their names, their wedding date, and the town they were married in.

Once everything was perfect, I printed the final copy on velum paper and used an exacto knife and paper trimmer to cut it to shape, then adhered it with spray adhesive.  It was a bit tedious and time consuming, but the end result was TOTALLY worth it.

This method looks much easier! http://www.homevolution.co/2012/09/first-dance-frame.html

Or you could use a mat with two openings - one for your photo, one for a printed copy of your lyrics

You could also do the lyrics directly on a photo, then put it on a canvas, like this blogger did here.

And if all else fails, you can pay someone on Etsy to do it for you!

Tuesday, October 2, 2012

Birth Record for a Baby Girl

Way back in June, I showed you the ornament I stitched up for a new family member, and I am now getting around to posting her birth record.


Inspirational Scripture - Faith (with thread) by Little House Needleworks
Stitched 2 over 2 on 28 ct. Sandcastle with included thread
Modified for personal use

Once again, I modified a chart to suit my needs because I couldn't really find a birth record chart that worked for what I wanted.  I took out the wording that was in place and charted in my own.  I ended up extending the flower stem to accommodate all the birth information, but I love how it turned out.  

If the parents choose a theme for the nursery, I like to match or coordinate as closely as possible, and this was the bedding they picked for their baby girl:

CoCaLo Baby Mia Rose

I've had the piece finished for a while (oh, maybe since December of last year), but framing is another story, especially with a stitched border in the piece.  Getting the border lined up and straight before framing isn't hard, but it is tedious and time consuming, and not my husband's favorite job, so sometimes it does take a little convincing.  I also had a small hiccup with this piece by not starting it where I should have.  Somehow I managed to mess up centering the piece and by the time I figured it out, I was too far into stitching it to rip it all out.  The piece still fit on the fabric, but there wasn't quite enough room to securely wrap the edge around the mounting board.

After some discussion, I took the piece to my LNS to ask for the owner's advice as she also offers framing services.  She suggested stitching a piece of muslin on the short edge, since the seam would be hidden by the matting and no one would be the wiser.  One, two, three - she stitched a spare piece of fabric on and we were ready to go.  (On a side note, this above and beyond type of customer service is one of the many reasons I continue to shop there.  Please patronize small businesses, especially niche businesses like LNSes, whenever you can, or we risk losing them all together.)

Now that the edge wrapped around the mounting board, it was much easier to frame.  Getting a decent photo with the glass was another issue, though, but this one did come out.  Finally, I was able to send this, the butterfly ornament, and the other Bride's Tree Ornaments we still owed the parents from their wedding (4 years ago) off to the family where they were greatly appreciated and able to be enjoyed for years to come.  I love it when a plan comes together.

Saturday, June 16, 2012

Nick's 2010 Ornament

And for the grand finale of this Parade of Ornament, perhaps the most shameful of all.

I finished stitching this piece in 2010, got the buttons for it in early 2011, and still couldn't manage to put the whole thing together until last week. Mind you, I've finished several ornaments for other people, but when it comes to getting it done for my own son? Bad mommy!! (We won't discuss why Nick doesn't have a 2011 ornament yet...)

The Stars are Brightly Shining by SamSarah Design Studio
JCS Ornament issue 2005
2 over 2 32 ct. Crystal Loch Belfast
Swarovski crystals, seed beads and JABC buttons

I fell in love with this cutie the second that I saw him, even though he was another snowman. I told you, it's a vicious cycle. And it doesn't help that I tend to *really* like the SamSarah Designs from the JCS ornament issues (this maybe be the 2nd or 3rd one I've stitched and finished, and at least the 4th I've marked for future stitching). The words also happen to be a line from my favorite "traditional" Christmas song - Oh Holy Night. I'm not religious, but there is something about that song that gets to me.

It's another very large ornament, and I had considered doing it over 1 but that would have thrown the proportion of the buttons off, so I went ahead with over 2. It's not the size of a dinner plate, but still.... Even though it's a larger ornament, it's still one of my very favorites that I've ever stitched. My most favorite is this one, Nick's very first ornament. Oh wait. Maybe this one. Or quite possibly this one. I'll stop now.

I did change out some of the colors - I wanted a deeper, variegated red for the scarf, and I subbed in some beads in the bush for some added texture. I also used beads for the eyes, and Swarovski crystals for buttons. I figured with the buttons, it would tie in nicely. And I changed out the gold stars for silver because we are, after all, a Dallas Cowboys family. (which is why "stars" and blue and silver are recurring themes in my stitching)

It's impossible to see in this photo, but the fabric has shiny iridescent threads running through the weave and adds a beautiful sparkle to the finished piece. And now that I've finished his 2010 ornament, perhaps it's time to get cracking on 2011. Maybe even 2012.

Thursday, June 14, 2012

A Basket of Apples

In the continuing saga of stitching and finishing ornaments for a Bride's Tree for not-so-newlyweds comes this next piece. Here representing the "basket of fruit" component is this lovely basket of apples:


Basket of Apples
Better Homes & Gardens 2001 Cross Stitch Designs
Stitched over 1 on 22 ct. aida

(Please note my finishing isn't quite as, ummm, crappy, as it looks. It's much nicer in person.)

This has also been completely assembled for at least 2 years, just waiting for some appropriate cording / trim.

Tuesday, June 12, 2012

A pink butterfly for a sweet baby girl


JBW French Country Butterfly for Kayla
Stitched 1 over 1 on 32 ct. Antique White
with Crescent Colors Cherry Tomato

Whenever I stitch a birth record for a newborn (or a 1 year old, as is usually the case by the time I get it done...) I like to include a Christmas ornament for families that celebrate Christmas. I've mentioned before how ridiculously sentimental I am about Christmas ornaments, so this should come as no surprise to you. It should also come as no surprise that I like to coordinate the ornament to the nursery theme whenever possible.

Almost four years ago, Mr. Sweet Pea and I attended the wedding of his cousin Christoper in NY, and last October, Chris and his wife were overjoyed to add baby girl Kayla to their family. Kayla's nursery theme butterflies in pink and brown, and I chose JBW's French Country Butterfly for her. The lettering was borrowed from another JBW French Country chart - French Country Bunny, I believe.

This is actually the second time I stitched the piece. Originally, I had stitched it 2 over 2 on 32 ct. It was nice, but not exactly what I had pictured. I went ahead and finished it anyway, or rather, attempted to finish it. We won't talk about exactly what happened, but let's just say a butterfly shape is not the easiest to cut out and stretch neatly around a cardboard template. A snip too far, a few curses and some grumblings of frustration and the 2 over 2 butterfly went in a drawer because I cannot bear to throw out any bit of stitching, even if it is ruined beyond repair. (I will ask my husband to make it disappear without my knowledge at some point.)

So I stewed about the mishap for a while, then finally decided to restitch the piece, this time 1 over 1. MUCH better. So much so that when I took it into my LNS, the owner asked if I'd mind stitching it again for the shop in purple. You'll be seeing this again (twice) actually in 2 different shades of purple (one for the shop, one for another of my nieces).

I finished this piece using a metal needlework form which ended up being the perfect size for this pattern and eliminated the need to cut my own templates. After the initial mishap, there was NO WAY I was messing with a butterfly shaped template, and I'm quite pleased with how this round shape looks anyway.

Wednesday, February 15, 2012

A sentimental gift

Remember Me by My Big Toe Designs
Stitched 2 over 2 on 32 ct. Fog
With Crescent Colors Blacksmith Blue and Raspberry Parfait
Accented with antique buttons

I spotted this design early in 2011, after my husband's beloved grandmother passed away just days after her 99th birthday. I knew it was something we had to stitch in her honor for his mom. He agreed, and I picked up the chart and threads. I originally wanted to do it in two shades of pink (Grandma's favorite color) but he thought it would be too much pink and chose a darker blue accented by pink.

I picked this raspberry shade of pink for a particular reason. Right after Grandma passed away, I sent out an email to the extended family and cousins to let them know what happened and what the funeral arrangements were. (I stay in regular touch with most of the cousins via email and Facebook and it was my way of helping my MIL, who was feeling overwhelmed at the time.) As the response emails started coming back, I noticed a consistent theme in what people were saying they'd most remember about Grandma - her welcoming kitchen and delicious food, specifically her homemade raspberry jelly. My husband has mentioned this himself numerous times, and it seems he's not the only one it had an impact on. It's a little thing, but I am very sentimental like that, and I think my husband appreciated it as well.

What is obvious in the piece are the antique buttons used in place of some of the specialty stitches. I've mentioned the button collection we inherited from Grandma before, and these are some of the buttons from that collection. Just before he framed it, Mr. Sweet Pea picked out some of his favorites and stitched them onto the piece.

This is another American Frame, with a twist, as it's not the original frame I selected. Right after I placed the order, I got an email saying there was a mistake on the website and the frame I ordered was not in stock. Ugh. I hate it when that happens, but I went back to the drawing board and picked another frame. As it turns out, I like this one better than the first one I chose, and it works beautifully with the furniture in my IL's dining room, where it now hangs. I should also mention that Mr. Sweet Pea used acrylic on this piece (which is why you can see the glare) and some clear spacers to leave enough clearance for the raised buttons.

My MIL absolutely loved the piece and was deeply touched by the time and care her son put into stitching and framing the piece. She says she walks by it every day and it makes her smile to see it.

Tuesday, February 7, 2012

A gift for newlyweds

I've mentioned before that my cousin was married this summer, and I've shown the Pinterest inspired wedding invitation ornament I made. I also did two other stitchy gifts for the bride and groom.

The first one, another ornament, had already been selected, purchased and started before the Pinterest idea came into being, so I ended up giving the bride and groom TWO ornaments for a non-existent tree. Yep. They had no tree this year, mostly due to a new puppy with a penchant for chewing. They figured it wasn't worth the potential damage to the tree or the pup to risk putting one up this year. Next year, hopefully. Anyway, this is the ornament I stitched for my cousin and her husband:

All Hearts Come Home for Christmas by Historic Stitches
Stitched over 1 on 25 ct. Ivory with CC Ribbon Red

So pretty! Finishing it was a little bit of a challenge with the heart shape - the center part wasn't very deep and the angles made getting the fabric wrapped neatly a little bit of a challenge but at least it didn't suffer the fate of another ornament I attempted to finish the same day. I might have clipped an angle a little too close on a butterfly and ended up having to restitch it, but that's a story for another day.

I also stitched a wedding record that my cousin herself chose. She had asked me to stitch a piece as a gift for a wedding she was in, and while she was looking through charts, she spotted this one for herself.


Wedding Row by Bent Creek
Stitched 2 over 2 on 32 ct. Belfast Linen in Flax
with recommended colors

Overall, I am pleased with how it came out, though if I stitch it again, I would probably make a change or two, notably the hearts. They looked red in the original pattern, but called for a more brownish thread. While it doesn't look bad, especially with the other muted colors, I would probably pick something a little more distinctly red for the hearts next time.

The frame was again ordered from American Frame, and I chose it to match their new bedroom furniture. Yes, I went back on my computer and looked at photos my cousin had sent me from when their furniture was delivered, and I tried to pick something that would work well with the simple Craftsman style of their bedroom. Mission accomplished, I think. Framing was a little tricky to get lined up correctly because the names stitched underneath throw the piece a little off center, or at least makes it look slightly off center when you first start figuring out how to place things. My husband ended up going back to the chart itself to find the middle point and working from there. I really should have him write a post on how he frames things - he has a patience with it that I completely lack.

In the end though, it all came out beautifully and my cousin and her husband LOVED it! (they almost didn't love it because I forgot that it was sitting on top of a cabinet at my ILs house and I had to run back in and get it before we left to meet up with the rest of the family.)

Monday, December 12, 2011

What's been keeping me busy...

You mean besides Pinterest? Technically this does involve Pinterest since I found the ideas on there. This idea has been re-pinned hundreds of times, and it's one of the first craft projects from the site that I did - a Wedding Invitation Ornament:


The idea is to cut up a wedding invitation into strips and put them inside a clear glass ornament. As you twist and turn the ornament, you can see glimpses of the wording. As soon as I saw the idea, I knew I'd be making one for my cousin and her new husband.

Luckily, I helped the bride with the invitations, so I had the files on my computer and didn't have to cut up the actual invitation itself. I printed out a copy and set to work cutting up the strips but I wasn't all that thrilled with the results. The size of the font varies, which adds visual interest, but doesn't lend itself to being cut up into neat, equally sized strips and it was difficult to gauge spacing between some of the smaller lines. It was bothering me that there were skinny little strips and much thicker strips. After several attempts, I decided to re-format the invitation itself into equally sized strips, which looked MUCH better inside the ornament (and let's not discuss the fact that I bought two sizes of ball shaped round ornaments, and two sizes of flattened round ornaments because I am a nut job and none of them are actually glass because they don't seem to sell individual glass ornaments but I have come to terms with the fact they are acrylic, mmmmkay?)

Once I got the strips coiled and stashed inside the ornament (a chopstick and a pair of long tweezers came in handy for this), I finished off the ornament with a sheer white ribbon from the actual invitation (they were pocket invites tied with the ribbon) and two smaller black ribbons to tie on their initials. The original ornament had a seashell charm as a nod to the theme of the wedding, and I liked the idea of the charm, but there was no "theme" to the wedding. I did, however, honor the black and white color scheme. I love, love, love how it turned out and I think my cousin and her husband will love it as well.

But that's not the only ornament I've finished up. In addition to the stitchy ornaments, I've been working with some buttons I've inherited from my husband's grandmother. She passed away this past January, just after her 99th birthday. My MIL generously gave me a very large jar and several bags of buttons that Grandma had collected over the years. I've had a lifelong fascination with buttons, stemming from the hours I spent playing with my own grandmother's buttons (both my grandmother and my husband's grandmother were accomplished seamstresses and had massive collections of buttons, fabric and notions).

I had some ideas for button monograms, but I wanted to see what else I could do with them, especially with shank buttons that would not lend themselves to being glued onto paper and framed. This is what I came up with:

These are just a few of the ornaments I created from Grandma's collection. (There are at least a dozen more ornaments I finished since taking this photo, and I've tried several other techniques which I will share soon.) Of course, most of the buttons were not sorted, so I spent several hours with my two year old, "playing buttons" (which means I spent several more hours while he slept re-sorting all the ones he had jumbled together). Most of them are strung on pipe cleaners, which worked out very well to not only shape the ornaments, but the fuzzy stuff on them helps hold the buttons in place better. For those that kept spinning around on their shanks, a little hot glue on the back helped hold them in place. I raided my own stash for the ribbons and have gotten VERY good at tying neat little bows.

I should also mention that I don't really have a dedicated craft space in our house yet, so I tend to work a lot in our dining room. (We generally eat in the kitchen, so I don't have to worry about cleaning up my projects for every meal.) All of these ornaments were made sitting at a dining room table we inherited from Grandma, so I spent a lot of time thinking about her as I was making them. She was quite crafty and clever herself and loved to crochet and sew. I loved her dearly, and these ornaments are a wonderful reminder of her.

This is a closeup of one of the ornaments we're keeping for our tree. It's hanging next to one of the dozens of hand-crocheted snowflakes that adorn our tree, every single one of them made by Grandma. And this one below is another closeup:

Monday, August 22, 2011

What I did this weekend...

This past weekend, my beautiful cousin Kerri was married in our hometown, and I was deeply honored to be part of her day as a bridesmaid. When I first started dating her cousin (who is now my husband), she was just a little girl, only 10 years old and this weekend, she was a lovely bride.

I will never forget the first time I met her and the rest of the extended family. It was at a family dinner, and as she and her parents were getting ready to leave, she walked up to me, gave me a HUGE hug and said, "When you marry my cousin, I am going to be a bridesmaid." At that point, I wasn't even thinking marriage, but I said, "You got it!" and hugged her back. I guess she was pretty perceptive, because even though it took 12 years, she walked down the aisle as a bridesmaid on the day I married her cousin.

When she got engaged herself, she called me at almost midnight, soon after it happened. I had no idea why she was calling so late, and I thought something had happened. When she yelled, "I AM GETTING MARRIED!" into the phone, I was so incredibly happy for her and just thrilled when she asked me to be a bridesmaid. Soon thereafter, I was able to call her and tell her about a little project WE were working on for her wedding - but had to wait a few weeks to let her know if it would be a ring bearer or a flower girl. More happy screaming and tears followed, as did the ringbearer.


I am not much for sharing photos of myself because I *do not* take a good picture. I just don't. But when I saw this posted by a very good friend of mine, I was so thrilled. It's such a beautiful picture and it's definitely going up on our Family wall. This is outside the church, just after the ceremony, and yes, this is the ring bearer in question. He's not quite two yet, so it was a little touch and go to get him to cooperate, but I have to say I was more than a little choked up when I saw him. My little baby isn't a baby, but he's the absolute light of my life (along with his dad).

The wedding was just perfect, the weather was awesome, and we were able to welcome Nick's favorite cousin to the family (Nick just adores Kerri's new husband). My wish for them is a long and happy marriage filled with love and togetherness. There will be good days and bad, but together, they can do anything.

Monday, March 21, 2011

I've got sunshine on a cloudy day...

Or rather, my lovely mother in law does.

My Sunshine by La D Da
Stitched over 2 on 32 ct. Lakeside Vintage Light Examplar
with Crescent Colors Black Coffee, Manor Red, Queen Bee and Pewter

Last year, I saw this design floating around the blogosphere and knew immediately that it was something we had to do for my mother-in-law. I remember my grandfather singing this song for me when I was very young, but it's a song my husband's mom sings to her three grandchildren all the time. This was perfect for her, and my husband stitched it for her for a Christmas gift. (Yes, I am just now getting around to posting a photo)

My job was to figure out how to frame it. Sometimes when I see a pattern, I have an instant vision of how to display it and this was one of those instances. I lucked out - stitched on 32 ct. fabric, this design fits perfectly into a pre-made 8x10 frame. However, finding an 8x10 frame with two matching smaller frames that we liked *and* that worked with the design proved to be a challenge. I hunted through several stores to find something that worked - not an easy task when your constant companion is an active 13 month old boy! He's a good kid, but he only has so much patience, and there's only so much room in the picture frame aisle. You need eyes in the back of your head to keep on a curious little one so he's not grabbing things off the shelf!

But we did manage to stumble across a frame at Bed Bath & Beyond, and lo and behold, there were matching 4x6 frames as well. Not only did they work with the design, but they were perfect for my ILs house. Score!

I ordered up prints of our son and his two cousins. The original plan was to do four total smaller frames - one for each of the three grandchildren and an extra one for any additional grandchild, but the 8x10 frame ended up looking much better with just the two frames, so we decided to put our son on one side and my BIL's children on the other. If any additional grandchildren enter the picture, it's easy enough to change out the photos.

The gift was a HUGE hit with my in-laws, especially my MIL, who cried. (good tears, not bad ones) She was so touched that we found a pattern for the song, and she absolutely loved the framing idea. The set now hangs at the top of their stairs so they can see it every day.

Friday, March 18, 2011

Happy St. Patrick's Day!!!

I'm a day late, but I was busy celebrating yesterday. St. Patrick's Day is my most favorite day of the year - I think it even outweighs Christmas, though I'm never one to pass up a Christmas cookie (or seven...). In addition to being exactly 1/2 Irish, I think I love St. Patrick's Day because it's not all wrapped up in preparations and pressure. My husband's family is mostly German and Polish, which means we don't have any family holiday obligations like we do most other major holidays (yes, St. Patrick's Day is a major holiday for me!), so we get to have our out little celebration. And it's a welcome break from the winter.

And did I mention the food? I love corned beef. Love it, even though it's more Irish-American than Irish-Irish. I read somewhere that most people in Ireland have never even eaten corned beef - beef is quite expensive over there, and the corned beef is something much more Irish American. Who cares though? I love the stuff and so does my husband. He never had it until we started dating, and I am pretty sure corned beef played a large part in why he married me. :-)

I went a little crazy this year and tried a new recipe from Steamy Kitchen for Corned Beef with Guinness. (BTW, this is NOT my photo). After discovering that Pennsylvania does not sell beer in six packs at distributors, and being unwilling to shell out $35 for a case of Guinness, I was able to convince my husband to stop at Wegman's on his way home, one of the few grocery stores that sells beer in smaller quantities. (And in fact, restrict just how many ounces can be purchased at one time. PA has the screwiest liquor laws, I swear.) But anyway, after getting over the fact that we no longer live in Delaware and have access to a Total Wine on every corner where I can get any damn beer I please, I ended up with the beer I needed for the recipe.

The verdict? It was good. Very good and quite possibly the most tender corned beef I have ever cooked. I started it in the crockpot because I did not have a large enough casserole dish or a dutch oven (shocking, I know, for someone who cooks as much as I do) to do it in the oven. Naturally, I had to head over to Bed Bath to see what they had - uhhh, nothing. Their in store selection is very poor in the way of dutch ovens. Luckily, the TJ Maxx next door had a plain white ceramic casserole with a lid, oven safe to 500 degrees. SCORE! (The $15 price tag didn't hurt, considering it was sitting on the shelf next to a Le Creuset that cost 10x that. At TJ Maxx. Seriously?)

So while the corned beef was good, it was not THE BEST I HAVE EVER HAD, and let's face it, I make some damned fine corned beef. I thought it was slightly salty, even though I rinsed it very, very well. And the Guinness flavor somewhat overrode the corned beef flavor that I love. So it looks like it will be back to the "boiling the bejesus out of it" method of cooking which involves a water change (I think that alleviates the saltiness problem). But we just didn't have the "what the hell happened here?" experience where we look down and discover we've inhaled most, if not all, of the corned beef. (That really has happened)

I would also like to mention at this point that I glaze my corned beef after boiling with a paste of mustard and brown sugar, which is then broiled for a few moments until brown and bubbly. This year, I went with a spicy whole grain mustard that I purchased intentionally for this project, instead of grabbing whatever mustard is in the refrigerator. I pronounce it to be DELICIOUS and a practice that will continue. I incorporated a splash of vinegar which gave it some zip, but wasn't entirely necessary.

I did find redemption in dessert. Normally I make a lemon meringue pie for St. Patrick's Day. I don't know why, I just do. We've had lemon meringue pie for every single St. Patrick's Day that I can remember. This year, I felt like changing it up, and gave my husband a choice of a Guinness Chocolate Cheesecake or Gooey Bread Pudding - The Irish Way. My husband loves bread pudding and will usually order it if it's on the menu. I will order a chocolate cheesecake or any kind of chocolate dessert (except cake - most chocolate cake is too dry). Naturally, he picked the bread pudding and because I love him, I made it.

HOLY COW!!! You should go out and make it, but I warn you - start with a small portion (seriously - like 1/2 cup. You can go back for more), and watch out for that sauce. It is one of the most sinfully good things I have ever eaten. In my whole life. The bread pudding was amazing, and I do not generally care for bread pudding. Did I mention you should make it? Oh yes you should.

I used chocolate chips that I ground up a bit in the food processor. I mixed the chips with the bread and left them in a buttered casserole (not sprayed) overnight on the counter because I like to live dangerously. I also made and refrigerated the sauce last night. If you have a container that locks, I suggest using it because you will be sampling the sauce with your fingers. This cannot be helped. This morning, I mixed up the egg mixture, but I added 2 more eggs and some extra milk, based on some of the reviews that I read (the recipe is also on epicurious.com). I used a mixture of light and dark brown sugar because the recipe didn't specify what kind of sugar, and I added just a tiny bit of cinnamon (maybe 1/8th of a teaspoon because I can't help myself and must mess with recipes).

My oh my oh my. Oh my. And oh yes, that Guinness Chocolate Cheesecake WILL be making an appearance at some point.

But wait.... there's more.

Since my husband a) doesn't much care for Valentine's Day as he is convinced it is a made up Hallmark holiday and b) had to spend 3 days, including Valentine's Day, in NJ for a work conference, we decided that we would celebrate St. Patrick's Day instead. Yay. Presents for me!!! (I did pack him up a lovely goodie bag of snacks for his hotel and made him a nice steak dinner before he left, so he didn't get completely out of Valentine's Day.) Behold...

A new Vera Bradly On the Go bag in Twirly Bird Navy, my Irish version of flowers- an oxalis plant and a shamrock plant, my Guinness beer, and not one, but two perfumes - Sinner and Saint by Kat Von D. I've already been subjected to shaming by several friends for liking Kat Von D's perfume, but let me just state for the record that I don't care one way or the other about Kat Von D - whatever floats your boat, but I'm not a fan. I wouldn't have even picked them up to smell had I not been intrigued by the Sinner and Saint names. Smelling them was my downfall - I couldn't get them out of my head, and my lovely husband obliged me buy purchasing not one, but both! Let me tell you - that Sinner is some sexy stuff... Ahem. This is most definitely a tradition we plan on continuing. It worked out quite well.

And as your reward for reaching the near end of this very long, ridiculously self centered post, I give you the cutest leprechaun ever...

I took some photos last week to send out some St. Patrick's Day cards to friends who celebrate and to Nick's Grandma and Poppy, and his Great Grandma. Nothin cuter than a little boy in a sweater and jeans. Unless it's a cutie patootie "sniffing" some flowers.


Happy St. Patrick's Day!!!

Saturday, January 1, 2011

The One that Started it All

Art Deco Frame by Julia Lucas Designs
JCS 2005 Christmas Ornament Issue
Stitched with DMC Pearle Cotton and DMC Metallic Thread

This is the ornament that started it all. I was flipping through the JCS 2005 Ornament issue after purchasing it on eBay a while back, and fell in love with this design. My father-in-law had been going through old family photos and scanning them onto the computer. One of the photos he scanned was from their wedding and I knew this ornament would be perfect.

As I've mentioned before, I didn't like the way the original instructions for the ornament called for doing the back, which is when I came up with the idea of making a double sided ornament. I had intended to doing their names and wedding date on the computer in a fancy font, print it out and call it a day. But on a subsequent visit to my in-laws, my mother-in-law brought out a box of loose photos and other wedding memorabilia and talked about some day putting it in an album or scrapbook. One of the items in the box was their actual wedding invitation, and I asked my father-in-law if I could make a copy of it. I *told* him that I was helping our cousin Kerri with her wedding invitations and she was interested in seeing what other family members had done, as I didn't want to explain what my real reason was and ruin the surprise.

When I got the copy home, I played around with it and made a miniature version of their wedding invitation for the back of the ornament:


Oddly enough, looking at the invitation sparked another conversation, as my father-in-law's father's name, Gerard, is misspelled on it. Normally, it wouldn't be a big deal, but since my son's middle name is in honor of his great grandfather, and it's spelled with the "e" on everything from his birth certificate to his announcements to his sampler we stitched, I wanted to make sure we had it spelled correctly. So yes, it was indeed misspelled on their wedding invitations.

But wait... there's more. In another "You must be kidding me" episode, I sent the pictures to be printed at WalMart, and asked my husband to pick them up on his way home from work. He called me from the store and told me the clerk at the photo counter refused to give him the prints because it was copyrighted work and we'd need a release from the photo studio to get the print. I was absolutely furious, and went over to the store myself to speak with the manager. I explained that this wasn't actually a professional photo - it was a snapshot taken by a friend, and I could in fact produce the original snapshot if necessary. And even if it was a professional shot, the photo had been taken forty five years ago - who knew if the studio was even still in business? The manager finally relented and gave me the print, but it cost them my printing business. I now either order the prints online, or get them printed elsewhere. I won't be having any prints done at WalMart, that's for sure.

And on a happier note, the ornament was gifted to my in-laws on Christmas Eve. They were absolutely thrilled with it, and very touched that I had put something together like this for them. I'm so glad they liked it, and it's now hanging front and center on their Christmas tree.

Friday, July 30, 2010

To Nick with love from Mommy and Daddy

I am very, very proud of this piece, as it's one of the few pieces I've stitched and framed AND hung on a wall in our own home. (More on that in another post). This is something my husband and I both worked on as a gift for our son. I stitched everything but the personalization before he was born, and my husband finished the piece by stitching in the name and the vital details.


Maine Fishing Village Sampler by Seguin Designs
Stitched 2 over 2 on Blue Dynasty Cashel fabric
with various threads
(name partially blurred for privacy)

We picked the piece from about a dozen options I found online. I never get hung up on searching for a specific birth record - I've changed a number of different charts to suit my needs. Of course, limiting yourself to just birth or wedding records can make the search less overwhelming, but you don't always find what you want, especially if you're not going for one of the more popular baby themes. I just look for something appealing that fits the theme, and figure out how to modify it from there, and if you look at the original sampler on the Seguin Designs site, you'll see I did quite a bit of modification.

In this case, my husband picked the Maine sampler because Maine is one of our most favorite places on earth and we hope to take Nick there some day soon. I also like that the piece was relatively simple, easy to modify and embodied some of my favorite "Maine" things including blueberries and lobster buoys. I even changed up the colors on the lobster buoys to add a little more color to the piece and more closely match photos of actual buoys I found online.

I stitched the piece while I was pregnant, and found the repetitive border to be rather soothing to stitch on those night when I was especially tired. When it was all finished, I ordered the frame from http://www.pictureframes.com/ and put my husband to work framing it up. Normally I would have picked a dark wood frame to coordinate with the furniture in the room, but everything else is framed in black, and I like how the black sets off the colors in the piece itself. By the way, if you're looking for framing materials, I HIGHLY recommend PictureFrames.com. They're a great site, their customer service is wonderful, and they have a very cool feature that allows you to upload a picture of what you're framing and play around with frames and mats so you can see what your piece will look like before you commit.

I have some issues with privacy which makes me feel a little uncomfortable sharing details of our private lives sometimes. However, I happen to be ridiculously pleased with how this room turned out, and wanted to share it. Especially since this room started out as what we called "The Princess Room" - pink walls, yellow ceilings, huge swirls, and gigantic flowers and butterflies painted onto the walls. Not really our taste at all, and definitely inappropriate for a boy.
As you can see, we went with a nautical theme, using Nautica William for the bedding, and hanging photographs of lighthouse and other beach / ocean related subjects on the walls. Well, except for the family pictures above the changing table. (Yes, I know it looks like it should be lower, but it's just out of the reach of a grabby little boy.)

One of the things I like best about the photographs on the walls is that most of them come from our own travels. There are photos from our honeymoon in the Outer Banks, from one of our trips to Maine, and also from Maryland and New Jersey.

Friends of ours gifted Nick with photos from their travels as well. Hanging above the chair are two photos from Massachusetts, taken and framed by my friend's very talented fiance, who has traveled all over the world taking photos.

Above the end table are photos of lighthouses and sailboats from another friend's journey to Scotland. (Yes, he did take those photos especially for me.) There is also a larger photo my husband took of a crab on one of our trips to Maine, specifically Bailey Island. You can't tell from the picture because we didn't think to use anything for scale, but the crab wasn't much bigger than a thumbnail.

I love this room. It's one of my favorite rooms in the house, and I love that it's a room that can grow with our son. I'm not a big fan of anything too cartoonish or over the top, so I am absolutely thrilled with how calm and serene this room is.

Saturday, May 15, 2010

Two more Bride's Tree Ornaments

Way back in 2008, I started on a project to stitch a set of Bride's Tree Ornaments for DH's cousin, who was getting married on August 1. While I did manage to get the first one stitched AND finished before the wedding, the rest of them kind of fell by the wayside. I did (do) have at least some of them stitched, just not finished into an ornament, but when I decided to buckle down and finish my son's first ornament into an actual ornament BEFORE I put away the Christmas decorations this year, I decided to finish up a few other ornaments I had hanging around.

Mind you, I am not a big fan of finishing things, unless I have an idea in mind. And even then, sometimes the tedious nature of finishing hampers my progress. But I am bound and determined to finish up AND send these ornaments to DH's cousin before their second anniversary in August. Wish me luck - I think I am going to need it!

This is the "bird in a nest" ornament, a freebie available on the Waxing Moons Website.


Spring Bluebird by Waxing Moon Designs
Stitched over 1 on 18 ct. fabric with DMC threads

I finished it with a pretty piece of floral fabric on the back and a bit of store bought satin cording.

This one I am going to have a VERY hard time parting with -- it's one of my favorites:


Christmas Hearts by Just Nan
Stitched on 32 ct. Bone fabric with overdyed and DMC threads, plus beads

This is one of those ornaments I knew exactly how to finish before I even started stitching it, and it was inspired from beginning to end, not to mention a lot of fun to stitch. So much so that I'm going to stitch it at least twice more - once more in this color variation, and a second time using pink and silver instead of red and gold.

It fit PERFECTLY into a tiny wooden embroidery hoop that I sanded and painted a pretty shade of green to match the thread. I can't stress enough how much a light sanding with a fine grit sandpaper can improve the look of craft store wooden objects. After sanding, I wiped the hoop with a damp paper towel to remove the dust, let it dry, then put on a coat of sealer (available in the paint section with the acrylic paints). A couple coats of paint to get the right color, and a top coat of varnish (also available with the acrylic paints), and the hoop was finished. You can't tell here, but I only sealed, painted and varnished the outer hoop - I left the inner hoop natural wood after sanding.

I tried to be as neat as possible with the stitching, but I still wanted it covered up. I took a plain piece of neutral cotton fabric and glued it to the rim of the inner hoop, across the open area. After it dried, I trimmed off the excess and put the stitching over the top of it. And yes, I used a little fabric glue to hold my stitching in place, then trimmed off the excess stitching fabric after that dried. The painted outer hoop covers the edges nicely, and no threads peek through.

As a final touch, I wrote the name and wedding date of the happy couple on the inside hoop.

Thursday, January 21, 2010

My last finish of 2009

Nick's First Christmas Ornament
Côté Mer by Couleur d'Etoile
Stitched 1 over 1 on 32 ct. evenweave with WDW Kentucky Bluegrass

I knew when Gaby sent me this chart (as a thank you for sending postcards to help out with her son's school project) that it was destined for something special - I just didn't know what. And then I got pregnant with my son and I knew this would be a PERFECT ornament for his first ornament (I plan on stitching one for him every year). We did Nick's nursery in a sailboat and lighthouse theme, and one of his favorite toys is a Glo-worm type seahorse. See? Perfect.

Just before Christmas, I pulled the chart out of my stash and raided my small cuts of fabric for a piece of evenweave. I knew I wanted to stitch this over one so it would make a petite ornament, and over 1 worked out great. In fact, it's triggered several over 1 stitching projects - I seem to be on that kick lately. (More to come on those later). The thread was one of those "oh isn't that pretty? I bet I could do something with that" impulse purchases.

With the holidays - shopping, baking, traveling, etc., I didn't manage to finish the ornament before Christmas. In fact, I put the last few stitches in it on New Year's Eve! But I was determined to *finish* finish it in time to get it in his ornament box when I took the tree down. And I did - YAY ME!! In fact, I finished several ornaments this past week, including another for our tree, which happens to be my first finish for 2010 and something you'll see in another post.


And because I like to personalize things, I stitched up the back with his name and year, plus a sailboat from the front. I love, love, love how it turned out, including the cording I used to trim. Which just happens to be a smaller version of the drapery tiebacks in his nursery. Yeah, how cool am I?

Tuesday, January 5, 2010

Happy New Year!!!

I hope everyone had a wonderful holiday season and is enjoying the New Year! For those of us here in the Northeast US, we're in the middle of a deep freeze - holy COW it's cold out there!!!!!! (All the more reason to stay inside where it's nice and warm and stitch!)

We had a great Christmas - our son Nick's first one. I still can't get over how lucky we are that he's such a good kid. So cheerful and laid back, and so good about letting people hold him. My 5 year old nephew and 7 year old niece were just over the moon about their new cousin, especially since they were allowed to hold and feed him. Who knew kids could get so excited about that? It was very cute to see them all together, and my nephew even shared his new Star Wars toys with the baby.

On the stitching front, I'm planning on taking on a one a week ornament challenge - more on that later. Also, my lovely MIL gifted me with Butternut Road's Celtic Banner chart and the cash to purchase the fabric for it. I know the pattern has been out for a while and some of you have stitched it, so I'm wondering what to do about the border. The chart calls for Caron Wildflowers in Cedar and Black Forest, but as I've searched the net, I've seen a few negative comments on these threads. I've never stitched with them, so I know nothing about it. For those of you who have either used these threads or stitched Celtic Banner, what can you recommend? Use the threads, or substitute something else? Perhaps the same colors in the silk threads or maybe a DMC conversion? Any thoughts on the subject would be most appreciated.

Wednesday, September 2, 2009

Help a girl out, please!

As most of you know, my husband and I are expecting our first child in October, and we've been getting things ready for his arrival. Sure, we've got the big stuff like the crib and the stroller, but what I am in need of is nearly impossible to find here in the suburban Philadelphia area.... Dallas Cowboys gear.

Yep. Dallas Cowboys stuff. I've been hitting Babies R Us, plus the department and sporting goods stores, and sure, there's a ton of Eagles (gack) and Phillies stuff, and even some Steelers stuff, but not a whole lot in the way of Dallas Cowboys gear. I'm guessing that most of these things are only locally availble in the teams' home markets, which is probably why I can't find them online either.

Yes, we have already purchased the Tony Romo Hallmark ornament on the condition that he not be placed on the tree until he gets his December act together... He may not join our collection of Cowboys ornaments until he can get through the playoffs without blowing it. LOL

I'd love to have his first picture taken in a Cowboys outfit (and bring him home in one), and of course, he's going to need a Cowboys outfit for Thanksgiving. I can order stuff online, but I've seen different things in places like Wal-Mart and Target, and I am sure they are probably way less expensive there than they are on some of these sites.

We're already expecting our boy to be over 8 lbs at birth, so newborn stuff isn't going to work, but 0-3 months and especially 3-6 months will. Mostly I am looking for some onesies (long or short sleeve), sleepers, or outfits like the warm up suit. We've seen a few jerseys around, but most of them seem to be too big (we're planning on getting him a Jason Witten jersey for Christmas).

I'm also looking for a few little Cowboy related things like pacifiers, a hooded towel, a picture frame, etc. And if you see anything cool that I haven't mentioned, please let me know. I know that there are usually things only available locally that I might not have even considered. So if you live in Texas or an area where you have access to Cowboys baby gear, I would be eternally grateful if you could help us out. Let me know ahead of time (so I can avoid multiples of the same item) and I will happily reimburse you for the cost of the item and the shipping to PA.

And if you happen to be looking for Eagles / Phillies / Flyers stuff, or Steelers or Giants, let me know and I can help you out (baby, child and adult sizes). Thank you, thank you, thank you!!!

Thursday, July 30, 2009

I have a really good reason for being behind on stitching

You see, my husband and I are expecting our first child, a son, in October. Yep, I'm pregnant. I've kept it quiet for so long because I have some complicated issues with my family and didn't need the additonal stress of dealing with that. But the cat seems to be out of the bag for the most part, so I thought I would share our happy news with my stitching friends.

So far, so good with this pregnancy, except for a ridiculous amount of exhaustion in the first trimester. I have never been so tired in my life! And dizzy to boot, but most of that seems to have passed, and I am into my third trimester now. Baby has been very active lately, and according to his ultrasounds, right on target for growth and development. We're very excited to meet him.

But being so tired and dizzy made it very hard to concentrate on stitching, and I really slacked off for a while, only managing to get in the bare minimum, which is why you haven't seen much from me lately. (I especially want to apologize to my two remaining PIFs - Deirdre and Tammie. I didn't forget about you ladies, I swear!!! I have your pieces stitched up, I just have to finish them!)

Since my DH and I both love the beach and lighthouses, we knew we were going with a nautical theme for his room. This is the bedding we selected, Nautica William.


We'll be painting the walls a light blue, coincidentally called Sailboat (okay, maybe the color name did have something to do with my selection) and going with cherry furniture, including the crib my in-laws bought for their grandson.

I, or rather my husband, did pick the sampler for the baby. It's from Seguin Designs and it's called A Fishing Village Sampler.


Maine is one of our favorite places, and this was the sampler that DH liked the best of about a dozen different ones that I had found. I'm making some modifications to the piece to include his name and vital information. I haven't started stitching yet, but I do have the fabric and the threads.

So if you've been wondering why my posting has been sporadic this year, now you know why. :-)

Monday, September 29, 2008

Fair and Square Received!

Michele emailed me on Saturday to let me know that she received my Round #9 squares and that she really liked them! (I'm so glad - I was a little nervous stitching for someone else, but now that I've seen how much fun the F&S is, I've signed up for 2 more rounds!)

This is what I sent Michele:

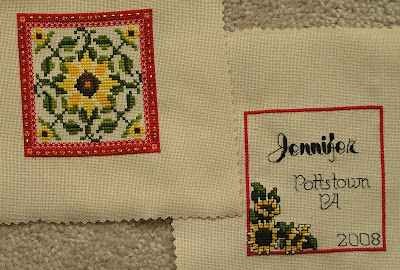
Manuela's Sunflower by Chatelaine Designs
Stitched over 2 on 32 ct. Bone evenweave with DMC and GAST threads
Signature Square from Bread Cloth leaflet

The original pattern called for a green border, but since Michele's favorite color is red, I had to change it. I was concerned it might look funny at first, but once it was all stitched up, I was really pleased with the color change. And the sunflowers on the signature square came from a bread cloth leaflet I had. All in all, I think the squares came out great, and I'm so glad Michele likes them!


I also sent Michele a matching scissor fob, complete with a sunflower charm. When I saw the little packet of garden charms, I knew the sunflower one would be perfect for her. I had these beads in my stash for a little while now - I was inspired by some pieces I had purchased as gifts for my 2 interns when they finished the program. I got them each a set of earrings and a matching illusion necklace, and I liked the pieces I bought so much, I ordered beads for myself. (Of course, I have yet to make any jewelry for me from them, but they sure did come in handy for this project!)

Other than that, DH and I had a busy weekend. His 96 year old grandmother was hospitalized on Friday with complications from spinal fractures and a blocked esophagus, and had a procedure done today. Needless to say she hasn't been in the best of moods and it's been tough on my MIL, so we drove home on Saturday morning to give her a little bit of a break. My BIL, SIL and the kids came in as well, so it definitely cheered Grandma up, and gave my MIL a much needed diversion. Grandma's procedure went well today, so we're hoping she will get a little better every day.