And I thought I was organized and on the ball! I have nothing on Allison when it comes to stash inventory software.
http://tbrexperience.blogspot.com/2008/03/look-at-organization-or-does-this-count.html
Showing posts with label storage. Show all posts
Showing posts with label storage. Show all posts
Thursday, March 6, 2008

Wednesday, March 5, 2008
Thread Storage
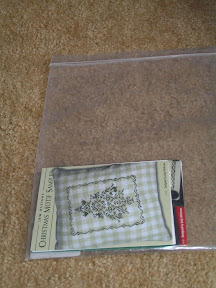 Part two in a series exploring the depths of my maniacal organization.
This time we will discuss thread storage, but first let me share one more chart picture. These are my very small charts which are stored in their own little ziploc bag so I can find them easily without digging. They're of mixed subjects - mostly a few Christmas charts and 2 small birth samplers. I only have a couple of these, so obviously this solution works for now, but may need to be modified should I start acquiring more small charts.
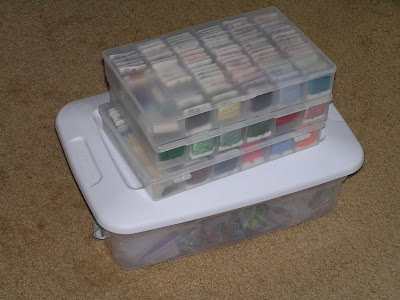 Now, onto thread storage. This is the bulk of my threads - 3 plastic bobbin boxes and a larger plastic container (the next size up from the plastic shoebox size. I have several of these - you'll see why. They're very handy)
The bobbin boxes contain an almost complete set of DMC threads in numerical order wound on cardboard bobbins. I've tried several different bobbins and come back to the DMC cardboards ones as the sturdiest - the cheaper ones just don't hold up as well. Some of the numbers are handwritten on the bobbins, but most of them have the tiny little DMC stickers on them.
 Using the DMC stickers serves another purpose other than just identifying the threads. I keep the unused stickers on their sheets and store them in a little ziploc bag (like the kind you get beads in, but a small snack size will work as well.) Whenever I go stash shopping, I take the stickers with me and I have a handy list of the colors I do not have on bobbins, so I can fill in my collection.
Also in this box, you can see the few spools of Kreinik threads that I have. There's only a couple, so they don't really need their own storage solution.
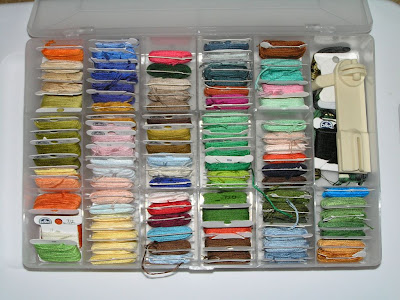 This is another box, the one where I keep my thread winder. If you're going to do floss bobbins, I HIGHLY recommend getting the thread winder. They're super cheap and SO helpful. I can clip it right to the edge of the floss box and wind onto the bobbins pretty quick. I did notice that the winder wobbles a little, so I wedge the plastic sample bobbin that came with the winder between the box and the winder legs and it makes for a tighter fit (and a less wobbly winder). I keep the winder in the box so I know where it is.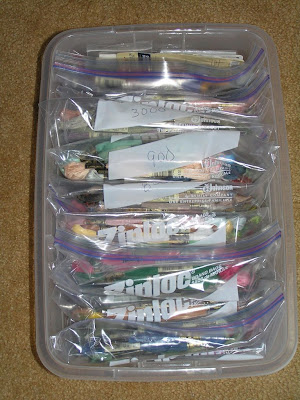
The floss is sorted into bags by number: 100s, 200s, 300s, etc., and the bags are numbered accordingly. I find that if you squish all the air out of the bag before completely closing it, it forms something of a vaccum pack and takes up less room. Then the bags are stored in numberical order until the floss is needed.
Now, you may ask yourself - "How does she know what's in there? Does she dig through it looking for what she needs?" And the answer, my friends, is "Oh, I know. I have the Magic Excel Inventory Spreadsheet". Yes, you heard me. The Magic Excel Inventory Spreadsheet. Okay, not entirely magic as it does not accomodate for human error / laziness, which occasionally happens, but for the most part it's a good system. One of the tabs on the sheet contains the complete list of DMC colors by number and description, and I have columns for bobbins and skeins which list the number I have of each. If new thread comes in, I add to the spreadsheet. If a bobbin or skein is removed from storage, the number on the spreadsheet is reduced appropriately. (This is where the human factor comes in as I am usually a little more lax about taking off than I am adding to). When I am kitting up a project, I need only to consult the Magic Spreadsheet to see what threads I have and what threads I need. It's about 95% accurate, depending on how much kitting up I've done and how recently I've pitched a hissy and re-inventoried everything.
There are lots of other goodies on the excel spreadsheet which is really the subject for another post. (If you would like a copy of a blank spreadsheet to do your own inventory, let me know. Probably I'll share.)
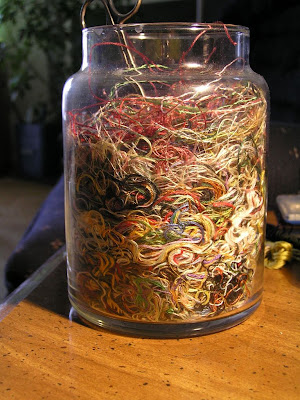
Seeing as how I have probably overwhelmed a lot of people, I will leave you with one last photo and let you begin the recovery process. This is our Ort Jar, born before we even knew what an Ort was. (For those of you that don't know, "ort" stands for old ragged thread, or the snippets of leftover threads). It's a candy jar we enlisted as a place to throw our snips of thread, and it contains pretty much every single snippet since we started stitching in 2002-2003, minus some threads I put out for the birds for nest building and the threads from our wedding sampler, which live in a glass Christmas ornament. Sometimes I squish down the threads to make more room, and no, I have no idea what I'm going to do with it once I can't squish them down any more.
Tuesday, March 4, 2008
A peek inside my stash storage
The other day, Michele asked how I stored my stash. Michele is a relatively new stitcher and she's been trying to figure out the best way to store her rapidly accumulating stitching stash. They say a picture is worth a thousand words, but how much are a bunch of pictures AND a thousand words worth? Seriously. I talk a lot. I have degrees in English. I'm pretty sure I am supposed to.
Anyway, I told Michele I was thinking about doing a post like this anyway, so I dragged out a bunch of my stuff and take some pictures so she could see for herself what works best for me. I also thought it would be interesting to see how other people store and organize their stash, so if you've got pictures or done a post on this, let us know. I love seeing what other people do, and many times, I can adapt their ideas to my own needs.
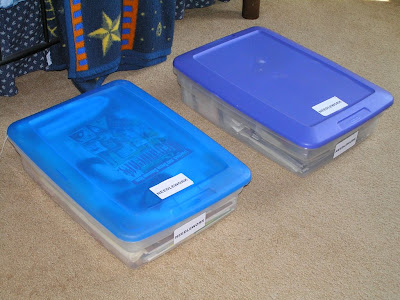 Okay, here we have the bulk of my stash storage - my underbed storage boxes. As you can see, these are labeled on the top and on the front so I know what's in them by just pulling them out a few inches.
In case you weren't aware, I LOVE underbed storage boxes. I can get 6 under the double bed in our guest room, and at least 8, possibly 10 under the king size bed in our room. (And 3 fit nicely under a twin size bed.) I love these boxes because they make otherwise wasted space useful, and they're not so deep you have to go digging through them to find things. I have 2 for my stitching stash, and 2 for photo album / scrapbooking stuff. I also keep my bed sheets in them, as well as a whole bunch of other stuff. The plastic keeps them clean and dust free, and the lids snap on tight.
 Now we remove the lids and see what's inside. This is my first box - mostly fabric storage. Most of the stuff on top are rolls of fabric I picked up at Wal-Mart when it was clearancing out the needlework supplies. I also have a few of those plastic "envelopes" underneath, and another roll folded over on itself.
I also found that I can get at least 2 cuts of fabric rolled up inside the plastic tubes or boxes, so I doubled up some of the rolls I had, which takes up less space. I also keep the extra pieces of the same count rolled up in those tubes. Keeping the fabric rolled is a good way to store it without worrying about wrinkles. But those boxes do take up a lot of space, so doubling up helps.
 Also in the box are my scroll frames that are not in use. The largest one takes up the most room, but I do take all of them apart before storing them. The smaller frame ends will fit across the width of the box, but usually the scroll rods need to be put in the long way.
You can also see a book under the scroll rod, and underneath that are more printed items - mostly books and magazines. I confess to having some non-needlework related items in there, such as a few craft and beading magazines, mostly because I don't have anywhere else to keep them and I don't mind keeping craft related things together even if they're not the exact same thing.
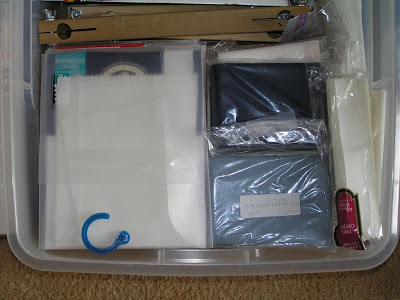 Here's a close up on the ends of the scroll frames, some plastic DMC Envelopes and some small bags of fabric cuts from my LNS. The LNS labels them, so I keep them in their original bags until I use them so I know exactly what they are.
I'm not quite as fabric obsessed as I've seen some stitchers, though I am not saying this isn't subject to change. I've been known to become obsessed about things - who knows what could happen? But since my fabric stash is relatively small and simple, this solution works for me. I think the key is labeling, and putting things back where they belong. Because fabric count can really screw up a project in ways you don't even know until you're too far into it, it's important to know what count your fabric is and to keep it labeled. I also like keeping pieces in their own individual bags - I don't worry about it because I don't have any hand dyeds, but I would imagine bleeding might be a problem, especially in humid climates, if they weren't kept seperate from each other.
Probably I should also be concerned about using plastic to store my stash, but to be honest, I'm not all that worried about it. I don't stitch on or with super expensive fibers and fabrics, and I rotate through what I have pretty frequently so that things are not sitting in plastic for years on end. And since the boxes are stored under beds in our main living area and not in a garage or attic where extreme temperatures, humidity, bugs, etc. are an issue, I think I'm okay with these boxes. (Temperature and humidity control are another reason I love underbed storage).
On to Box #2 - Chart, Kit and WIP Storage
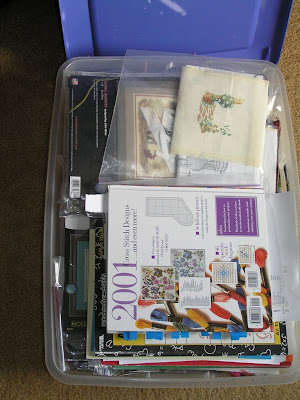 In this are most of my unstitched charts, kits and a few books, as well as some WIPs I got tired of working on. (My more active WIPs are in my stitching box in my stitching area.) I also have a few reference books in here, the ones that don't fit in the other box.
Speaking of reference books, one I highly recommend is 2001 Cross Stitch Designs by Better Homes and Gardens. I don't think it ever hurts to have a few good stitching reference books, not only for small motif type patterns, but for basic stitching and finishing techniques. My recommendation is to hit up your local library and see what they have, and more importantly, what appeals to you, then purchase the ones you like the best for your own collection. You can go the bookstore route, but don't forget about half.com, which is where I got my copy of the book (after checking it out at the library). You don't need to go crazy with reference books, but it's nice to have them on hand. At some point, my reference books are going to need to move to an actual bookshelf because they're taking up valuable stash storage space.
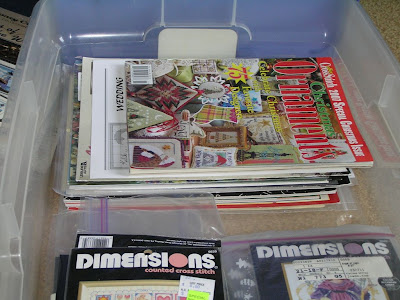 Also in Storage Box #2 is my collection of unstitched, unkitted charts and a few stitching magazines. The charts are grouped by subject / occasion, as in all the wedding charts are together, all the lighthouse charts are together, etc. These are all charts that I haven't stitched, or will stitch again at some point. If I think I'll need it, it stays in the box. If I don't think I'll ever stitch it, or a portion of it, again, the chart gets moved into one of my binders which is the subject of another post.
Also, because I don't have a lot of magazines to worry about, I just keep them in with my other charts. For people with a lot of magazines, I'd probably recommend looking into a magazine specific storage solution, especially if your magazines are rare and/or expensive.
You can also see my small kits, mostly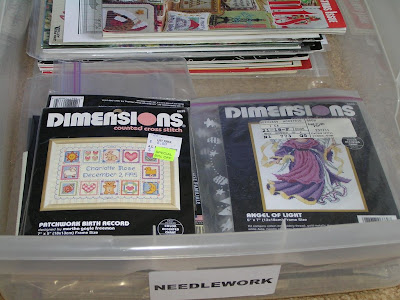 Dimensions kits, in the box. They're all removed from their plastic store packaging and put in quart size ziploc bags, which take up MUCH less room and are easier to store.
I do confess that some of these charts have been in there a while as I don't stitch much from kits anymore. Eventually I will probably make myself complete the kits as part of a stash clean out challenge, but I don't think that will be for a while yet.
On top of the magazines and unstitched charts, I put kitted up charts, each of which gets their own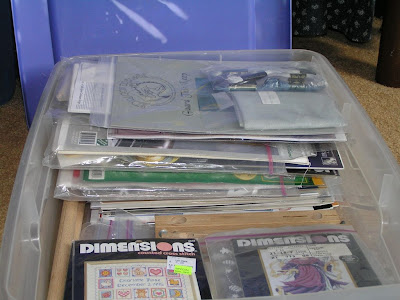 plastic gallon size storage bag that contains the chart, the fabric, and the necessary fibers for the project. You can also see I fill in the space between the two piles with my extra scroll frames.
So there was your little sneak peek into my stash storage solutions. Next time, I will post pictures of my thread storage and my active stitching boxes.
UPDATE: Check out blogs by Cathey (Pumpkin Patch & Co.) and Teejay (The Passion of my Needle) for their storage solutions.
Anyway, I told Michele I was thinking about doing a post like this anyway, so I dragged out a bunch of my stuff and take some pictures so she could see for herself what works best for me. I also thought it would be interesting to see how other people store and organize their stash, so if you've got pictures or done a post on this, let us know. I love seeing what other people do, and many times, I can adapt their ideas to my own needs.
 Okay, here we have the bulk of my stash storage - my underbed storage boxes. As you can see, these are labeled on the top and on the front so I know what's in them by just pulling them out a few inches.
In case you weren't aware, I LOVE underbed storage boxes. I can get 6 under the double bed in our guest room, and at least 8, possibly 10 under the king size bed in our room. (And 3 fit nicely under a twin size bed.) I love these boxes because they make otherwise wasted space useful, and they're not so deep you have to go digging through them to find things. I have 2 for my stitching stash, and 2 for photo album / scrapbooking stuff. I also keep my bed sheets in them, as well as a whole bunch of other stuff. The plastic keeps them clean and dust free, and the lids snap on tight.
 Now we remove the lids and see what's inside. This is my first box - mostly fabric storage. Most of the stuff on top are rolls of fabric I picked up at Wal-Mart when it was clearancing out the needlework supplies. I also have a few of those plastic "envelopes" underneath, and another roll folded over on itself.
I also found that I can get at least 2 cuts of fabric rolled up inside the plastic tubes or boxes, so I doubled up some of the rolls I had, which takes up less space. I also keep the extra pieces of the same count rolled up in those tubes. Keeping the fabric rolled is a good way to store it without worrying about wrinkles. But those boxes do take up a lot of space, so doubling up helps.
 Also in the box are my scroll frames that are not in use. The largest one takes up the most room, but I do take all of them apart before storing them. The smaller frame ends will fit across the width of the box, but usually the scroll rods need to be put in the long way.
You can also see a book under the scroll rod, and underneath that are more printed items - mostly books and magazines. I confess to having some non-needlework related items in there, such as a few craft and beading magazines, mostly because I don't have anywhere else to keep them and I don't mind keeping craft related things together even if they're not the exact same thing.
 Here's a close up on the ends of the scroll frames, some plastic DMC Envelopes and some small bags of fabric cuts from my LNS. The LNS labels them, so I keep them in their original bags until I use them so I know exactly what they are.
I'm not quite as fabric obsessed as I've seen some stitchers, though I am not saying this isn't subject to change. I've been known to become obsessed about things - who knows what could happen? But since my fabric stash is relatively small and simple, this solution works for me. I think the key is labeling, and putting things back where they belong. Because fabric count can really screw up a project in ways you don't even know until you're too far into it, it's important to know what count your fabric is and to keep it labeled. I also like keeping pieces in their own individual bags - I don't worry about it because I don't have any hand dyeds, but I would imagine bleeding might be a problem, especially in humid climates, if they weren't kept seperate from each other.
Probably I should also be concerned about using plastic to store my stash, but to be honest, I'm not all that worried about it. I don't stitch on or with super expensive fibers and fabrics, and I rotate through what I have pretty frequently so that things are not sitting in plastic for years on end. And since the boxes are stored under beds in our main living area and not in a garage or attic where extreme temperatures, humidity, bugs, etc. are an issue, I think I'm okay with these boxes. (Temperature and humidity control are another reason I love underbed storage).
On to Box #2 - Chart, Kit and WIP Storage
 In this are most of my unstitched charts, kits and a few books, as well as some WIPs I got tired of working on. (My more active WIPs are in my stitching box in my stitching area.) I also have a few reference books in here, the ones that don't fit in the other box.
Speaking of reference books, one I highly recommend is 2001 Cross Stitch Designs by Better Homes and Gardens. I don't think it ever hurts to have a few good stitching reference books, not only for small motif type patterns, but for basic stitching and finishing techniques. My recommendation is to hit up your local library and see what they have, and more importantly, what appeals to you, then purchase the ones you like the best for your own collection. You can go the bookstore route, but don't forget about half.com, which is where I got my copy of the book (after checking it out at the library). You don't need to go crazy with reference books, but it's nice to have them on hand. At some point, my reference books are going to need to move to an actual bookshelf because they're taking up valuable stash storage space.
 Also in Storage Box #2 is my collection of unstitched, unkitted charts and a few stitching magazines. The charts are grouped by subject / occasion, as in all the wedding charts are together, all the lighthouse charts are together, etc. These are all charts that I haven't stitched, or will stitch again at some point. If I think I'll need it, it stays in the box. If I don't think I'll ever stitch it, or a portion of it, again, the chart gets moved into one of my binders which is the subject of another post.
Also, because I don't have a lot of magazines to worry about, I just keep them in with my other charts. For people with a lot of magazines, I'd probably recommend looking into a magazine specific storage solution, especially if your magazines are rare and/or expensive.
You can also see my small kits, mostly
 Dimensions kits, in the box. They're all removed from their plastic store packaging and put in quart size ziploc bags, which take up MUCH less room and are easier to store.
I do confess that some of these charts have been in there a while as I don't stitch much from kits anymore. Eventually I will probably make myself complete the kits as part of a stash clean out challenge, but I don't think that will be for a while yet.
On top of the magazines and unstitched charts, I put kitted up charts, each of which gets their own
 plastic gallon size storage bag that contains the chart, the fabric, and the necessary fibers for the project. You can also see I fill in the space between the two piles with my extra scroll frames.
So there was your little sneak peek into my stash storage solutions. Next time, I will post pictures of my thread storage and my active stitching boxes.
UPDATE: Check out blogs by Cathey (Pumpkin Patch & Co.) and Teejay (The Passion of my Needle) for their storage solutions.
Thursday, December 13, 2007
SBQ: Thread Management
Do you do anything special to your threads before putting them through your fabric to make them more manageable? (Submitted by Nancy)
Other than licking the end of the floss to get it through the eye of the needle, nope. Of course, I've been working mostly with DMC and have only recently branched out into overdyed threads, so I never really felt the need to, unless you count working with metallics. I hate working with metallics. Probably some sort of thread conditioner would make my life easier. So I ordered a bit of Thread Heaven when I placed a Stitching Bits and Bobs orders. We'll see how that works out.
Well. That was easy enough. Might as well contemplate some more SBQs while I am at it.
6/14/2007: How do you store your WIPs and other projects that you have kitted up? (Submitted by Jennifer)
I try not to kit too much up ahead of time, but when it comes to stitching, Ziploc bags are the best thing ever. (Okay, one of the very best things). If the chart doesn't come in it's own ziplock bag, I put it in one, along with fabric and fibers that I may have purchased especially for it. Until I'm ready to work on it, it lives in a plastic underbed storage box with the rest of my stash.
When I'm getting ready for new pieces, I usually pull about 2-3 things that are appealing to me or that I need to get done and they move into a smaller plastic storage bin next to my stitching chair. At this time, I make sure I have everything I need in there to start stitching, and I will usually take out the fabric and cut it to size, marking the center. That piece goes in the project bag, and the excess goes back in the original fabric packet bag that's marked with the count and color.
I work on scroll frames, so I usually don't worry about taking pieces off the frames between stitching. All of the fibers for current projects are stored in a plastic bag, and that bag, along with the chart, sits on top of everything else in the stitching bin next to my chair. If I'm working on a small project, that goes in the box too and the lid snapped on. If I'm on a frame that doesn't fit, I put the frame where it won't get damaged or dirty, usually behind my chair. (No kids and a very complacent cat makes this possible)
6/6/2007: What has been your most challenging project and why? (suggested by Ish)
I might have mentioned this one before - the On Safari piece I stitched for my friend Michelle's daughter. They did her nursery in a jungle theme and I couldn't find anything I really liked for her birth record until i found this piece on eBay. I was so excited when I saw the listing that I didn't realize it was on plastic canvas until after the sale was complete. But I thought I'd give it a try anyway, and at first, it was fun. Stitching on the canvas was a new experience and different that stitching on fabric (it was still using threads). Stitching the crosses wasn't bad, but for some reason, doing the backstitching on this piece was sheer torture for me and it took me longer than I thought to finish it. I'm pleased with how it turned out, but I would never want to stitch it again.
5/30/2007: How many needles do you use during a project? Have you ever loaded up a needle for every color? Do you use a new needle for every project or recycle your favorite needle? (suggested by Kathryn)
I probably use about a dozen needles at various times during a project. I picked up a square plastic magnetized needle case in the quilting section and I like to use that because it keeps my needles in place and with the lid that snaps shut, they don't fall out when I travel. Probably I should sort my needles better according to size and all, but I like to pick needles by how they feel - I can tell the difference between the really thin ones for high count fabrics and the thicker ones for Aida just by feeling them.
If I am going to be stitching a lot of one color, I will cut my strand of floss, separate out the threads and thread up three needles with 2 strands each. I only like to have one or two colors out at a time, so if I stop working with one of those colors and move on to a new one, I take the threaded needles, stick them into the threads on the bobbins and wind the excess thread around the bobbin. Then I move onto the next color and repeat the process. Usually when I am done, I have to pull out at least 5-6 needles from various bobbins, unthread them, and wind the thread back around the bobbin for the next thread.
Subscribe to:
Posts (Atom)